Enhancing Your Profile.
ELAN envisions that our new Member Directory can be a space that facilitates connections between members of our community and the Quebec arts community at large.
Last month, we provided a short guide to help you write your bio. While you browse through the directory, you may notice that some member profiles are more personalized with pictures and/or videos to make them really stand out. You can do the same!
This tutorial will guide you through the steps to embed media and upload a profile image.
How Do I Embed Media?
One way to spruce up your profile is by embedding images and videos into your bio. This task is fairly simple, but it may take some trial and error.
Let us walk you through it:
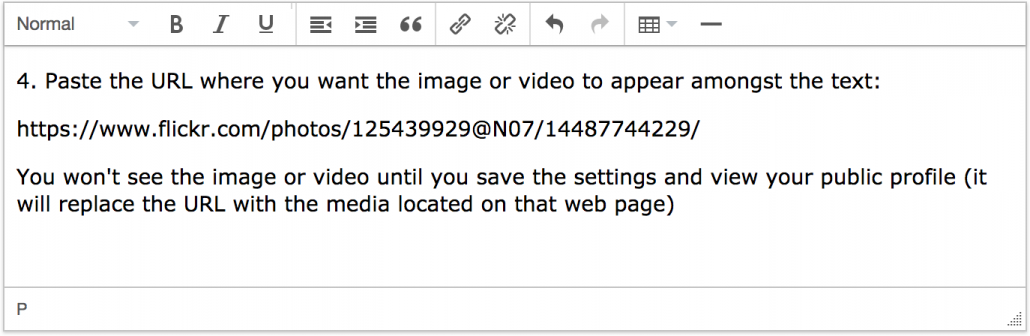
- In order to embed an image or video to your bio, it must have been uploaded to another website first. Find the website where the image or video is located (on platforms such as YouTube, Vimeo, and Flickr) and copy the URL
*NOTE: Photos and videos on Facebook and Instagram cannot be embed to your member profile. - Login, scroll to the very bottom of the page and click “account settings”
- Scroll down to the Biography section
- Click “Save Public Settings”
Troubleshooting Tips
- Ensure that the URL is not bolded, italicized or hyperlinked
- Ensure that the URL is on its own line, and there is nothing above or below it
- Copy/paste the long URL; don’t use embed codes or URL shorteners like youtu.be, fb.me and goo.gl
- Keep in mind when you’re formatting the bio that images appear much larger than videos with this tool
How Do I Upload a Profile Image?
It is such a joy to see your faces as we scroll through our new Member Directory ! Although you are not obligated to upload a picture of yourself, it is one way to personalize your profile. In order to upload a profile image, the file size must be less than 56 KB, which is super tiny! We recognize that these restrictions may be a barrier for some members. By following these instructions, we hope to alleviate the stress and frustrations that may come with this process.
General Guidelines
- The file size must be less than 56 KB
- The length and width of your image dimensions must be equal (like a perfect square)
- We recommend that you resize a copy and leave the original file unmodified for future use
There are many different ways to crop and resize an image file, but the steps below use programs that should be preinstalled on your computer (like Preview or Paint). The instructions differ depending on if you’re using a computer running Mac OS X or Windows. So, choose the appropriate steps below based on the operating system that you’re working with.
Please note that although we have tried to make these instructions as all-encompassing as possible, because there are many versions of Mac OS X and Windows, there is a chance that the version you’re running (or your personalized settings) require a slightly different set of steps.
Mac OS X
- Locate the image that you wish to upload using Finder
- Make a copy of the image file before you open it (click on the file, press and hold the ⌘/command key then press the D key at the same time to duplicate)
- Double-click this copy to open in Preview (it should be in the same folder as the original and assigned the same name followed by the word “copy”)
- Once the image is open in Preview, select View > Show Markup Toolbar
- Ensure that the “Rectangular Selection” tool is selected from the drop-down menu that appears at the far right of the toolbar, above the image
- Click, hold and drag your cursor to draw a square over the section you wish to crop, then drag on any of the corner blue dots to adjust the dimensions and ensure that the width and height are identical values
- Press and hold the ⌘/command key, then press the K key at the same time to finish cropping the image
- Select Tools > Adjust Size…
- Ensure that the “Resample Image” box is checked
- Try entering a smaller value into the “Resolution” field and look at the “Resulting Size” box underneath to see the number of KB decrease
- Continue adding smaller values into the “Resolution” field until the “Resulting Size” is less than 56 KB
- Click OK and close Preview (save the file when prompted to do so)
- Find the file in your Finder again, click it once so it’s selected, press and hold the ⌘/command key then press the I key at the same time to open the “Get Info” window
- From the “Get Info” window, under the General tab (you may have to click the ▶ to expand) double-check that the size shows a value less than 56 KB
- If the size is greater than 56 KB, re-open it in preview and repeat steps 8-14 until the saved file is less than 56 KB
- Login, scroll to the very bottom of the page and click “account settings”
- Scroll down to the Profile Image section and click “Choose File”
- Find the file on your hard drive, open, then scroll down and click “Save Public Settings”
Windows
- Locate the photo that you wish to upload on your hard drive
- Make a copy of the image file (right-click on the file and select Copy, then right-click elsewhere in the folder and select Paste)
- Right-click on this copy (it should be in the same folder as the original and assigned the same name followed by “- Copy”) and select Properties
- Take note of the file size
- Right-click on the copy again and select Open with > Paint
- From the top menu, select Image > Rectangular Selection
- Click, hold and drag your cursor to draw a square over the section you wish to crop, then drag on any of the corner blue dots to adjust the dimensions and ensure that the width and height are identical values
- Press and hold Ctrl+Shift+X keys at the same time to finish cropping the image
- From the top menu, select Image > Resize and Skew (if you can’t find this menu, try Ctrl+W)
- Ensure that the width and height fields show identical values so that it’s a perfect square
- Ensure that the Resize by “Pixels” radio button is selected and the “Maintain aspect ratio” box is checked
- Keeping in mind that the file size must be less than 56 KB, enter a smaller value into the Resize “Horizontal” (not Skew) field based on the current file size (noted in step 4)
- Select File > Save
- Select File > Properties to see its new “Size on disk”
- If the size is greater than 56 KB, re-open it in Preview and repeat steps 9-14 until the saved file is less than 56 KB
- Login, scroll to the very bottom of the page and click “account settings”
- Scroll down to the Profile Image section and click “Choose File”
- Find the file on your hard drive, open, then scroll down and click “Save Public Settings”
Still Stuck?
Finally, if you have any questions, you’re welcome to email membership@quebec-elan.org or call 514 935 3312.
See you in the directory!